The Art Of Espalier

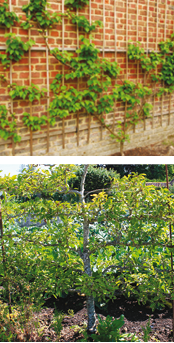
If you’ve ever seen a beautifully-shaped tree growing flat against a wall, you’re looking at the horticultural art of espalier. Here in Virginia, George Washington grew espaliered fruit trees such as apples and pears at his Mount Vernon estate, both for beauty and for the necessity of producing fruit for food and cider in a compact space. The tradition continues today in
Mount Vernon’s formal upper garden, where central vegetable beds and formal boxwood parterres are framed by walls lined with ornamental flowers and espaliered fruit trees.
While Mount Vernon is a recognizable example of espalier in our area, the practice was well known during the Colonial era. Pronounced “es-PAHL-yay” or “es-PAHL-yer,” the term comes from the French word for a ladder or trellis, and also the Italian word “spalliera,” referring to a back rest or shoulder support.
 Espalier has been used for centuries, beginning as far back as the ancient Egyptians and Romans. It was popular in Medieval Europe, where it was used in walled gardens, both as a space-saving measure, and to help warm-weather fruit trees survive colder European winters, by using the protection and reflected heat of south-facing walls. The technique remains popular in the United Kingdom, particularly with fruit trees, while in the U.S., espalier can be found not only on historic properties, but also in urban settings where garden space is at a premium. This time-honored method is both beautiful and practical, and can be a wonderful feature in a modern home garden.
Many horticulturists recommend planting trees and woody shrubs in the fall, because it gives the plants time to become established before being stressed by summer temperatures. So if you’d like to have this elegant feature your own garden, now is a good time to get started! Here’s what you need to know.
What plants work well for espalier?
Simply put, your goal is to prune young trees and woody shrubs into compact, carefully-designed shapes, by training pliant branches onto guide wires or support structures. It can be purely decorative, but is also a practical way of growing fruit—one which conserves space, allows easy harvest, and can actually increase yield, since this pruning method allows air and light to reach all parts of the plant, helping with equal distribution of energy. Grape vines in a vineyard are a classic example of this technique.
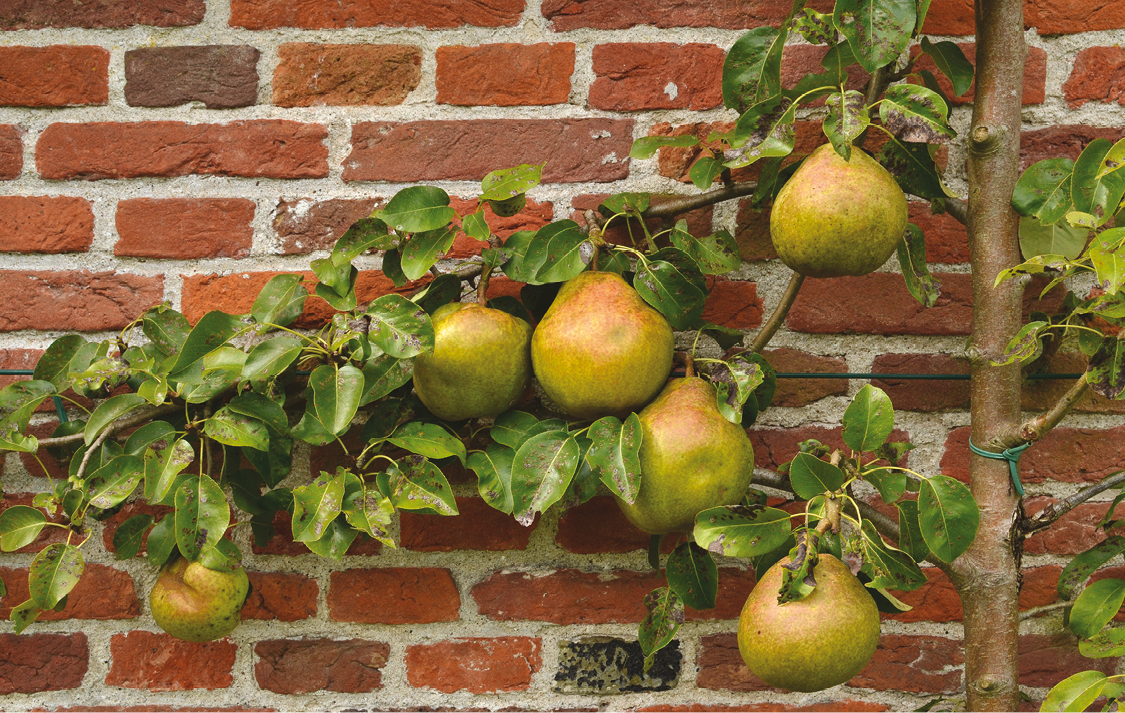
If you’d like to try an espaliered fruit tree, apples are an excellent choice, and because of their growth and fruit habits, they’re a good option for those just starting out. Pears are also popular for the same reason. Other fruit trees to consider in our USDA Plant Hardiness Zone (7a for most of us, though if you’re at higher elevation or tucked into a foothill, you might be 6b) are plums, cherries, apricots, peaches, nectarines, persimmons, mulberries and hardy figs. Choose dwarf or smaller varieties, so you’re not fighting a constant battle against the plant’s natural growth habit.
For purely ornamental purposes, camellia, Japanese maple, dwarf Southern magnolia, cotoneaster, crepe myrtle, blue cedar, and euonymus can all be espaliered nicely. Pyracantha is sometimes suggested as an option, but its other name, “firethorn,” is extremely apt and should give you pause before trying it, unless you’ve got a very sturdy set of gloves!
Whichever you choose, know that you’ll want to start with a fairly young plant whose limbs are trainable. More on that later, but first, let’s talk about design!
Some popular shapes
There are many possible shapes for espalier—as many as the human mind can dream up and execute—but some of the most popular are the cordon, candelabra, fan, and lattice shapes. You’ll also see wavy, heart-shaped, or more free-form styles, but for our purposes, we’ll stick with the basics.
The cordon is a simple, practical shape, generally featuring several horizontal tiers branching off the main trunk. It’s the most common design, and probably the best choice for fruit trees, since it keeps the harvest within easy reach. It’s also great for beginners, as it requires less precision pruning to maintain a recognizable shape. Finally, it’s a good choice for screening views or as a living fence, and can be trained along a sturdy free-standing trellis.
The candelabra begins like the cordon, but each horizontal tier is turned upright at a 90-degree angle. This one is easily achievable for novices too, as long as you keep an eye on your plant during the growing season so that you can bend up the limbs before they harden off. It makes an excellent focal point against a wall.
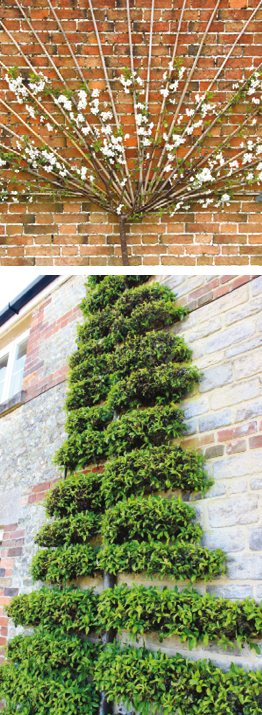
Fan shapes are also a great focal element. A short trunk branches into an array of straight lines, similar to a sunburst. Cherries, plums and figs do well in this configuration, as do ornamentals. If you want a formal fan shape, you’ll need to establish good form with your young plant in the beginning by keeping the branches in fairly uniform, straight lines. If you prefer a more organic aesthetic, you’ll still want to start with several fairly uniform limbs arcing away from the central trunk, but once they are established, you can allow smaller side shoots to branch off, which will soften the formality, and oftentimes looks like a two-dimensional version of a regular plant!
 The lattice, or Belgian fence, espalier design is a diamond-shaped grid of greenery, and a showstopper when grown as a living fence. Evergreen plants are perfect for screening views, whereas deciduous plants provide wonderful winter interest with their pattern of bare limbs. Whether grown against a wall or with free-standing supports, multiple plants and a fairly mathematical, methodical approach are required in order for it to look its best, as the grid pattern needs to be evenly spaced for full effect. However, if you’re looking for “wow” factor in your garden, this one will do it.
Location and support structures
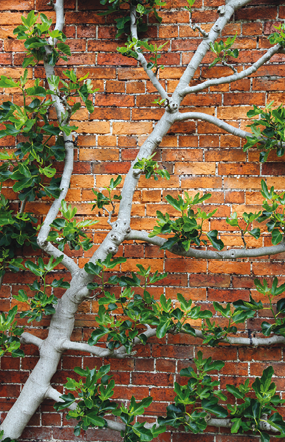
Espalier can be placed either up against a wall, or free-standing with support. A stone, brick or stucco wall will work well for espalier, but steer clear of wooden fences, lest they rot or get pulled down by the weight of the plant. Keep in mind what our ancient brethren knew: that a stone or brick wall will hold some warmth, which can be a boon in winter, but in our hot summers can also reflect heat, which may be a concern. A brick chimney makes a good backdrop for a smaller ornamental espalier, while a length of wall looks striking with a series of espaliered plants. Pergolas are sometimes used for espalier, but again, be aware of potential damage to wooden structures.
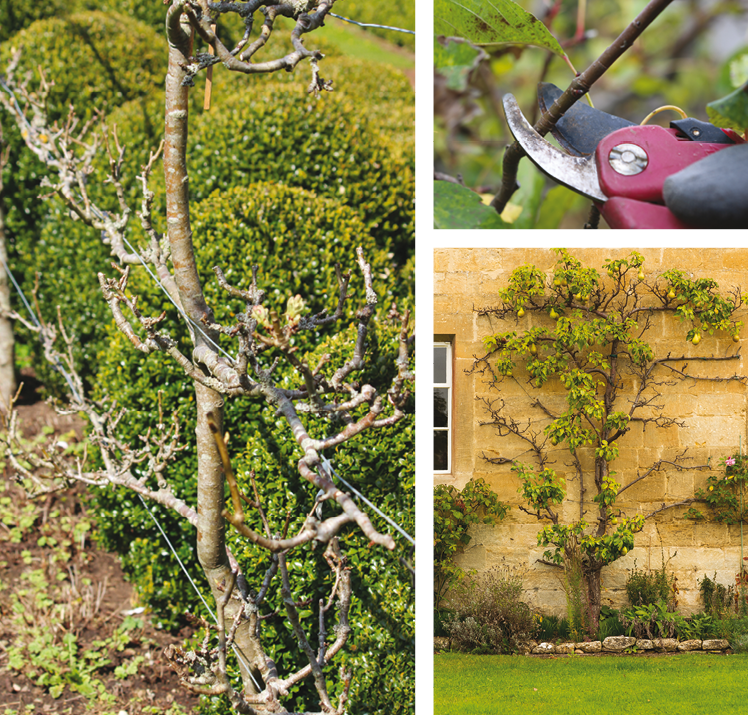
Once you’ve settled on your location, decide how you will anchor your plant or plants. The simplest method is to attach bolts and guide wires to your wall. On a brick wall, bolts can be placed in the mortar, but if that’s not an option or if you have stone that won’t allow it, you can install metal or sturdy wooden posts up against the wall, and attach your guide wires to that. Before beginning, use measuring tape and a piece of chalk to map out your desired framework. Then, at vertical intervals, either install bolts into the wall, or put posts into the ground, then bolts onto the posts. These bolts will hold your horizontal guide wires. A good general plan is to place your lowest guide wire about 12-18 inches from the ground, and use similar intervals between rows. You can use a wooden trellis up against a wall; just know that over time it could deteriorate.
If you’re planting a living wall or free-standing espalier, place your posts at regular intervals. Vertical posts should be no more than 8 feet apart to provide enough support for both wires and branches, and if you’re using heavier-limbed plants you may need the supports to be closer together. Also, make sure wooden posts are sturdy enough for the job; four-by-fours will handle most espaliered plants.
Once the supports are in place, you’re ready to dig your hole and get to planting! Situate the hole for your plant about
6-10 inches in front of your supporting structure.
The million-dollar question at this point is likely to be—now what? Much depends on the plant and shape you’ve chosen. You may be able to find espaliered plants at your local nursery. Typically they would be young plants trained into a simple “T” shape, which will work well for a cordon or candelabra shape. If you’re planting an espaliered fruit tree, know that it generally takes about five years to bear fruit, so if you can find a three-year-old tiered plant, you’ll save yourself some time and effort.
If you’re not that lucky, just look for a young plant with pliable limbs. If you see one whose shape suggests a “U” or a “Y,” grab it! You can prune back the center stem and be ahead of the game. If your plant is taller than the first horizontal wire and you’re aiming for a cordon, candelabra, or lattice shape, prune the top of the plant back to no more than a couple of inches above the cordon, but be sure you have several buds below it, which will sprout into shoots later. For best results with cordon and candelabra shapes, don’t let the main vertical trunk get more than about six inches above a cordon until horizontal limbs have grown about 3/4 of the way along the wire. Then you can allow the vertical trunk to continue to the next tier, and repeat the process.
For a fan shape, you’ll want five or six leaf buds. If you don’t have enough, you can let the topmost bud (the “leader”) grow for a season, then cut it down the following winter, which will generate more side buds that can be trained the following year. You might also be able to find a bushy shrub or fruit tree and gradually bend its branches into a fan shape. If you know your espalier goal, you can shop for plants with the right habit. Or just pick a plant you like, and go with its flow!
 For an espaliered lattice wall, a “Y” shape is key. If you don’t have plants with the right shape, you can plant a row of “whips,” or unbranched shoots. Near the bottom horizontal wire, find two buds on each side of the stem, and cut the stem right above this point. Remove all other growth, and continue until you have a row of fairly uniform stems. New growth will form the “Y” shape, and as each diagonal branch crosses another, you can tie both to a horizontal fire, forming your grid. As the plant matures, focus most of your pruning on the top, which will encourage the lower areas to become fuller.
Whatever the intended shape, be careful pruning in fall, as you don’t want to encourage lots of new growth which won’t be hardened off by first frost. Do what you can with existing limbs, then let the plant settle into its new home for the winter. In spring, you can trim off unwanted growth and put your plan into action. During the growing season, once shoots have grown several inches, tie the stalks you want to keep into their desired location and prune off the rest. You’ll want to make sure you tie the limbs when they’re still flexible, using gentle stretchy ties (nurseries sell ties specifically for this purpose, or you can use small strips of an old t-shirt). Allow side branches or shoots you want to keep to grow at least a foot before pruning, but trim off any unwanted growth whenever you like.
If you’re growing fruit trees, you’ll need to read up on specifics for maximum yield, but here are two basic tips. One: Don’t prune off fruit spurs, because they won’t grow back. Fruit spurs tend to be short and fat, and grow close to the branch, whereas leafy shoots spurs have pointed ends. Two: Winter pruning encourages growth, producing leaves and stems. Summer pruning (which is pruning new vegetation) inhibits growth, and encourages fruiting. You can further promote fruiting by pruning leafy branches back to about the third leaf on the shoot, which will stimulate the growth of fruiting spurs further down. Generally, vertical growth will produce more branches, and horizontal growth will produce more fruit, so prune accordingly after the plant flowers in spring.
In general, it’s best to leave at least three leaves’ worth of growth on any shoot you prune, unless you want the branch to remain bare. Also know that pinching back your plant’s leaders will encourage thicker, lush growth.
Espalier requires patience, as it will take several seasons for your design to take shape, and probably several years beyond that to reach its desired form. Once established, yearly pruning will keep it in top form, and your patience will be rewarded with a stunning garden accent that, with proper care, will provide beauty for many years.